For this example, I'll go back to a dataset I've used in the past called mydata.Rdata and it's in the Code and Data Download site.
One function that is extremely useful to know is names(). The names() function will show you everything that is stored in R under that object name. So, for example, if you do
where mydata is a dataframe object, you will get the names of the columns, which are the vectors that comprise the dataframe. Note that names(mydata) is an object itself (because everything is an object in R) - it is a character vector of length 7. You can save this vector and print out the class to verify this.
But names() can be useful for much more than just column names, as we'll see in a moment.
But before we go on, let's take a moment to remember how subsetting works. In subsetting, you use square brackets to pull out exactly the element of an object that you want. So if I want to subset a dataframe, I can say
mydata.subset<-mydata[,c(1:2)]
which is saving into the new object mydata.subset, all the rows and only the first two columns of the mydata dataframe.
Now, let's combine the concept of using the names() function with the concept of subsetting to change one of the column names of our dataset:
names(mydata)[4]<-"Weight_lbs"
Here we are saying, of the names(mydata) object, take the fourth component and make it "Weight_lbs". Now, if you run the names() on our dataframe, we find the change has been made:

Ok, so now we'll see how the names() function can be used in other applications.
1. Summary objects
There are two ways to extract information from objects in R, using subsetting and using the "$" operator.
Below, we summarize the Age vector and store the results in sum.vec. We print out the sum.vec object and the print out the corresponding names. Now we can extract the 1st element of the summary vector of Age in the following way using the [ ] operator.
This gives us the first element, which is the minimum. We could also do:
sum.vec[c(2,3,5)]
for the 25th, 50th, and 75th percentiles.
The other way to extract is by using "$". For example, the summary() function on a table object gives you a Chi squared test:
Here, you can extract any of the pieces of information that came out in the test, including the number of cases, the number of variables, the test statistic, etc. We can extract the pvalue of the test statistic by using the "$" operator, like this:
Let's see how this can be useful in the next example.
2. Regressions and statistical tests
The standard linear regression that we run in R is using lm(). It looks like this:
But there's a lot more that R has calculated that is not shown here. We can see this by saving this linear regression as an object and running names() on it:
So we see that saved under the reg.object are the coefficients, the residuals, fitted values, degrees of freedom, and a lot more. To find out everything that names() provides for a given object, look it up by doing ?lm. Now, to extract any of these components, like the residuals, use the "$" operator like this:
reg.object$residuals
You can make use of this extraction by taking the mean of the residuals
hist(reg.object$residuals, main="Distribution of Residuals" ,xlab="Residuals")
Don't forget that you can summarize regression objects using summary(), and get the names() of that summary too, like this:
which will give you more objects you can extract from your regression. You can use the names() function on any statistical model or function such as aov(), t.test(), chisq.test(), etc.
3. Histograms and boxplots
Finally, let's go back to that histogram and save that into an object. There are objects under names() of the histogram object now:
I showed how you can manipulate those in my post on histograms.
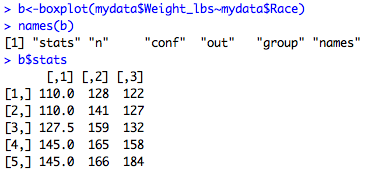
Similarly, for boxplot:

Here I've extracted the stats object which gives you the lower whisker, the lower hinge, the median, the upper hinge, and the upper whisker for each group, which you can see below.


